This quick-start-guide lists steps in configuring a FAIR Wizard or DSW instance to achieve a similar configuration as the instance norway.fair-wizard.com. The page aims to support colleagues who are starting to use the tool and wish to set similar configuration settings to our instance.
FAIR Wizard is the software-as-a-service version of the Open Source DMP tool Data Stewardship Wizard (DSW).. In addition to the Data Management Planner (which equals DSW), FAIR Wizard contains the module Admin Center, Integration Hub, and Analytics.
The detailed user guide is available under https://guide.fair-wizard.com/en/production/.
Appearance of the instance
- Instance settings
- Admin Center > System Settings > Organization: Fill out description field
- Admin Center > System Settings > Features: We have disabled AI Assistant and Tours
- Authentication settings: We use SAML with Feide
- Admin Center > Settings > User Interface > Authentication > SAML/ Shibboleth
- Tip: Consider if users should be able to login while you are still setting up things
- Provide information about your instance, login options, and available support on the login screen
- Admin Center > Settings > User Interface > Dashboard & Login Screen: Add Login Info and Sidebar Login Info
- Tip: Add info to re-route users who wish to use other Norwegian instances
- Admin Center > Settings > User Interface > Dashboard & Login Screen: Option to add announcements on dashboard and/or announcements, e.g. to inform about the pilot or updates
- Admin Center > Settings > User Interface > Dashboard & Login Screen: Add Login Info and Sidebar Login Info
- Customize the appearance
- Admin Center > Settings > User Interface > Lock & Feel: Instance name, logo and color profile contribute to making the instance recognizable
- Tip: Use different colors for production and preview instance
- Admin Center > Settings > User Interface > Lock & Feel: Set custom menu links. See our setup below. NB! This setting has to be done both in Admin Center and Data Management Planner
- Admin Center > Settings > User Interface > Lock & Feel: Instance name, logo and color profile contribute to making the instance recognizable
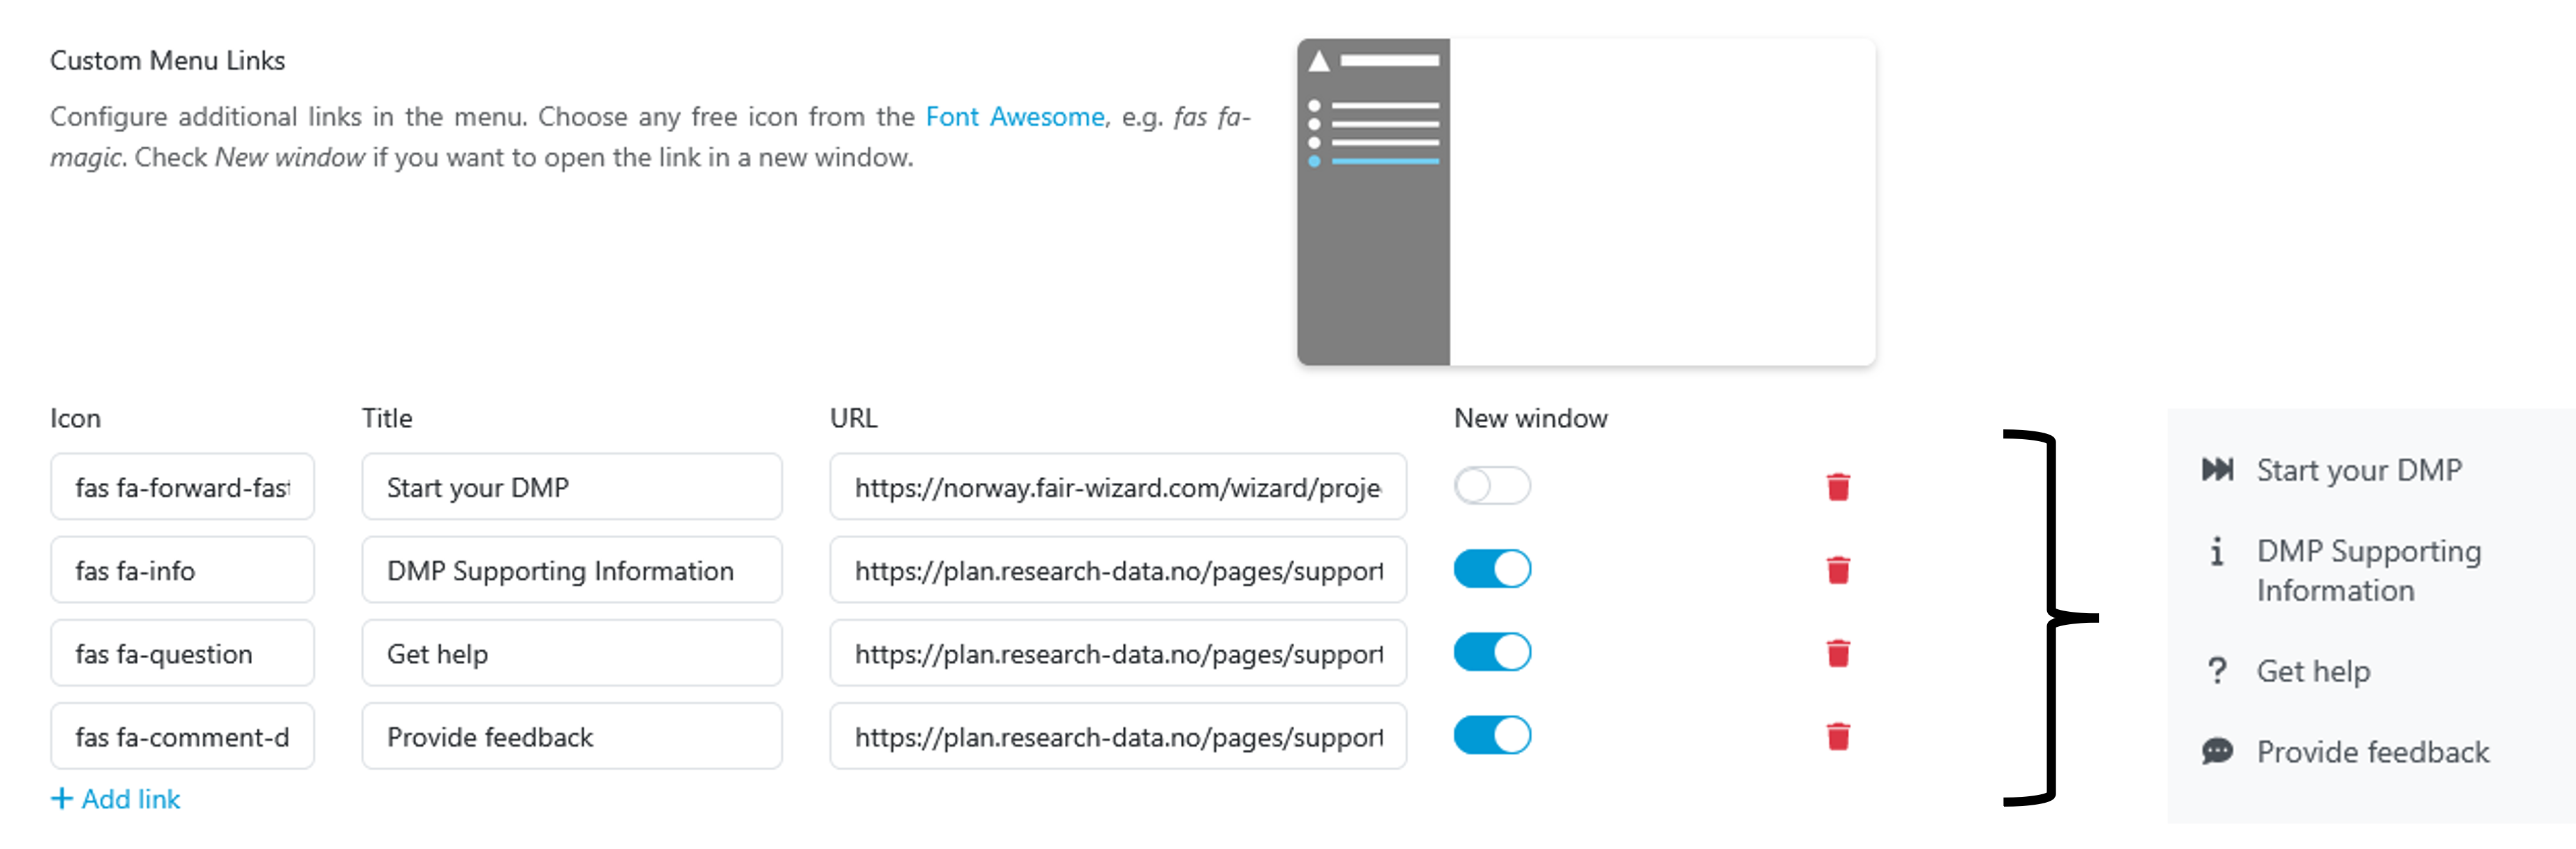
Custom menu link setup.
Data Management Planner
- Set custom menu links
- Data Management Planner > Settings > User Interface > Menu: See above
- Settings for project visibility and sharing
- Data Management Planner > Settings > Content Settings > Projects: Our settings below
- Project visibility: enabled
- Default project visibility: Private
- Project sharing: enabled
- Default project sharing: Restricted
- Anonymous projects: enabled (only for the purpose of direct links on this page, can be disabled elsewise)
- Project creation: Templates only
NB! See below for creating templates - Summary report: disabled
- Feedback: disabled
- Project tagging: disabled
- Data Management Planner > Settings > Content Settings > Projects: Our settings below
Import from Registry
- Import Knowledge Model from Registry: Norwegian DSW Knowledge Model v1.1.0
- User guide
- NB! Default templates should be created by selecting tags (see below)
- NB! Export works currently only with default or lean Questionnaire Report and maDMP export (see below)
- NB! FAIR sharing integration requires an API key under Knowledge Model Secrets (see below)
- Import Document Template from Registry: Questionnaire report - lean
Template setup
- The following steps are necessary to create a Project Template
- Create project by selecting Knowledge Model and tags
- View: Settings to your choice (e.g. everything hidden but non-desirable questions)
- Settings: Set name and add description
- Settings: Set default document template (e.g. Questionnaire Report - lean and HTML)
- Settings: Enable Project template
- Share: Enable Visible by all other logged-in users
- We are using four pre-set questionnaires to accommodate different user needs. See also the guidance for researchers.
- Minimum: tag minimum
- Minimum and ELSI: tag minimum, ELSI
- RCN/ Science Europe and ELSI: tag RCN/ Science Europe, ELSI
- RCN/ Science Europe and ELSI and HPC: tag RCN/ Science Europe, ELSI, HPC
- Other tags can be ignored for the setup
- In addition, we have a freestanding pre-award Knowledge Model. We are uncertain whether this Knowledge Model will be continued.
Integrations
A few preparations are necessary to use some of the integrations in the Norwegian DSW Knowledge Model.
Institutional resources
To keep the resources compatible with Data Stewardship Wizard (DSW), we have chosen to maintain the list of institutional policies and resources as an API. To propose changes to the content, make a pull request or get in touch.
FAIR sharing
The FAIR sharing integration requires an API key
- User guide
- Create API key: 1) Register FAIRsharing account. 2) Generate ApiKey with base64 in command line:
echo -n 'username:password' | base64 - Data Management Planner > Knowledge Models > Secrets: Set values for ‘fairsharingApiKey’ and ‘fairsharingApiUrl’
User management and test users
- Default user role should be ‘Researcher’
- Admin Center > System
- It can be useful to create dummy users to be able to test out different roles
- Admin Center > Users: Invite button, create dummy user. If using a dummy email address, one can set a passphrase for the test user after creating the user.
Contributors
 Lead
Lead
University of Bergen (UiB)